colorize video using neural-networks with python and shell scripts
I wanted to write a script (or a few) that would input a video and output a the video with original RGB removed and neural net generated colorization added.
This code was inspired by the code that was written by Sunita Nayak at BigVision LLC. It is based on the OpenCV project.
Satya Mallick post that sparked interest:
- Input: Color or B&W Video File (preferably '*.mp4')
- Output: AI Colorized Video File The neural network recreates each frame's colorization individually
Big Buck Bunny
Click the image below to view in new window:
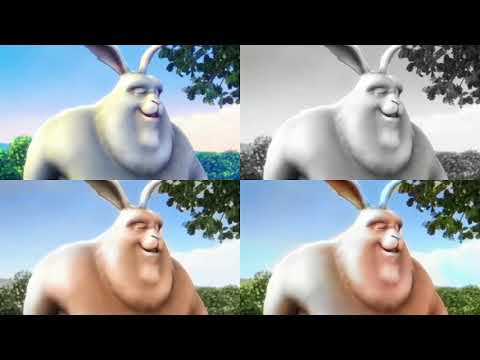
- https://youtu.be/I7DkwbDBRwI 30 second sample of colorization without norbalance output video:
Original Big Buck Bunny Colorization

Colorized Big Buck Bunny with Zero Knowledge of the Original Colorization

Greyscale Processed Frames

- FFmpeg command line tools "A complete, cross-platform solution to record, convert and stream audio and video."
The simplest of all the land is our friend Ubuntu, where the following command would suffice for installation of ffmpeg library. Make sure that ffmpeg is in your bin path etc if you are unable to enter in terminal after restart or after reinvoking bashrc using "source".
$ sudo apt-get install ffmpegThe simplest way to install ffmpeg on Mac OS X is with Homebrew. Once you have Homebrew installed install ffmpeg from the Terminal with the following:
$ brew install ffmpeg
Simplest way to get ffmpeg installed is to
- https://www.ffmpeg.org/
- https://www.wikihow.com/Install-FFmpeg-on-Windows extract the contents of the zip folder and add the directory containing only the extracted files to your PATH environment variables.
running getModels.sh requires 'wget' which is not native to Windows 10 "A command-line utility for retrieving files using HTTP, HTTPS and FTP protocols."
I used version 1.19.4 which was found here: https://eternallybored.org/misc/wget/ wget-1.19.4-win64.zip, wget.exe
extract the contents of the zip folder and add the directory containing only the extracted files to your PATH environment variables. start a new Command Prompt and the wget command should be available
$ wget --versionAfter entering the -V --version command you should see something similar to the following command prompt output:
GNU Wget 1.19.4 built on mingw32.
... *a bunch of versioning text*...
    /win32dev/misc/wget/out64/lib/libiconv.a
    /win32dev/misc/wget/out64/lib/libunistring.a -lws2_32
...*a bunch of versioning text*...
Copyright (C) 2015 Free Software Foundation, Inc.
License GPLv3+: GNU GPL version 3 or later
... *a bunch of licensing text*...
Navigate back to the 'colorize-video/' directory and run
$ getModels.shI used Python 3.6.5, 3.6.2 and 2.7.15
- https://www.python.org/downloads/ When working on Windows I found that Python 3 was necessary for cv2.dnn "dnn" module use in the colorization step.
Using pip https://pypi.org/project/pip/
$ pip install numpy
$ pip install opencv-python
$ pip install imutilsI found that Python 3 was necessary for cv2.dnn "dnn" module use in this step. Potentially needing:
pip3 install opencv-contrib-python*models/* contains the models used in this example we use Facial Landmark detection 68 points.*images/* contains images
*greyimages/* contains grey scale images for colorization
*greyimages/coloredimages/* contains colorized images Open a terminal in the headpose directory and run (with sudo if needed on your system):
$ pip install -r requirements.txtNow you should have installed the necessary packages
You still need to download the models:
#Specify the paths for the 2 model files
protoFile = "./models/colorization_deploy_v2.prototxt"
weightsFile = "./models/colorization_release_v2.caffemodel"
#weightsFile = "./models/colorization_release_v2_norebal.caffemodel"

# Load the cluster centers
./pts_in_hull.npy')
Give privilages to run the shell script to start application
$ chmod +x getModels.sh
$ chmod +x all_colorize.sh
$ chmod +x colorized_pngs2vid.sh
$ chmod +x pngs2vid.sh
Then run the shell script
$ ./getModels.sh


$ python grey-video2images.pyI found that Python 3 was necessary for cv2.dnn "dnn" module use in this step. Potentially needing:
pip3 install opencv-contrib-python$ ./all_colorize.sh$ ./colorized_pngs2vid.shif using Windows:
$ ./colorized_pngs2vid_windows.shThe colorization part of this code is based on and adapted by the code that was written by Sunita Nayak at BigVision LLC. It is based on the OpenCV project. It is subject to the license terms in the LICENSE file found in this distribution and at http://opencv.org/license.html
If you are interested in using Deep Learning Caffe Models with OpenCV: https://www.pyimagesearch.com/2017/08/21/deep-learning-with-opencv/
-Ross Mauck