-
Notifications
You must be signed in to change notification settings - Fork 4.7k
New issue
Have a question about this project? Sign up for a free GitHub account to open an issue and contact its maintainers and the community.
By clicking “Sign up for GitHub”, you agree to our terms of service and privacy statement. We’ll occasionally send you account related emails.
Already on GitHub? Sign in to your account
Updates to the contributor.rst file and addition of CONFIGURATION.md file #6644
Open
nabrissakhan
wants to merge
14
commits into
jupyter:main
Choose a base branch
from
nabrissakhan:main
base: main
Could not load branches
Branch not found: {{ refName }}
Could not load tags
Nothing to show
Are you sure you want to change the base?
Some commits from the old base branch may be removed from the timeline,
and old review comments may become outdated.
Open
Changes from 10 commits
Commits
Show all changes
14 commits
Select commit
Hold shift + click to select a range
113a99a
usercontrolandfreedom
nabrissakhan 61be667
reverse change
nabrissakhan d17b95f
adding configuration documentation.
nabrissakhan 9bf3552
Merge branch 'jupyter:main' into main
nabrissakhan ec83e82
Updated Contributor Documentation for rst file
nabrissakhan be81ffe
Merge branch 'main' of https://github.com/nabrissakhan/notebook
nabrissakhan cfe15cc
Edited and made changes to contributor.rst
nabrissakhan 0044006
Made edits to contributor.rst
nabrissakhan f21712b
Edits and corrections to contributor.rst
nabrissakhan 235be48
Updates to the contributor.rst file
nabrissakhan e4fac72
[pre-commit.ci] auto fixes from pre-commit.com hooks
pre-commit-ci[bot] 9278f87
Merge branch 'main' of https://github.com/nabrissakhan/notebook
nabrissakhan 928bd62
Edit test
nabrissakhan 0bfc84d
[pre-commit.ci] auto fixes from pre-commit.com hooks
pre-commit-ci[bot] File filter
Filter by extension
Conversations
Failed to load comments.
Jump to
Jump to file
Failed to load files.
Diff view
Diff view
There are no files selected for viewing
This file contains bidirectional Unicode text that may be interpreted or compiled differently than what appears below. To review, open the file in an editor that reveals hidden Unicode characters.
Learn more about bidirectional Unicode characters
| Original file line number | Diff line number | Diff line change |
|---|---|---|
| @@ -0,0 +1,58 @@ | ||
| # Configuration Overview | ||
|
|
||
| Beyond the default configuration settings, you can configure a rich array of options to suit your workflow. Here are areas that are commonly configured when using Jupyter Notebook: | ||
|
|
||
| Jupyter’s common configuration system | ||
|
|
||
| Notebook server | ||
|
|
||
| Notebook front-end client | ||
|
|
||
| Notebook extensions | ||
|
|
||
| Let’s look at highlights of each area. | ||
|
|
||
| Jupyter’s Common Configuration system | ||
| Jupyter applications, from the Notebook to JupyterHub to nbgrader, share a common configuration system. The process for creating a configuration file and editing settings is similar for all the Jupyter applications. | ||
|
|
||
| # Jupyter’s Common Configuration Approach | ||
|
|
||
| Common Directories and File Locations | ||
|
|
||
| Language kernels | ||
|
|
||
| traitlets provide a low-level architecture for configuration. | ||
|
|
||
| # Notebook server | ||
|
|
||
| The Notebook server runs the language kernel and communicates with the front-end Notebook client (i.e. the familiar notebook interface). | ||
|
|
||
| Configuring the Notebook server | ||
|
|
||
| To create a jupyter_notebook_config.py file in the .jupyter directory, with all the defaults commented out, use the following command: | ||
|
|
||
| ``` | ||
| $ jupyter notebook --generate-config | ||
| ``` | ||
|
|
||
| :ref:`Command line arguments for configuration <config>` settings are | ||
| documented in the configuration file and the user documentation. | ||
| Running a Notebook server | ||
|
|
||
| Related: Configuring a language kernel to run in the Notebook server enables your server to run other languages, like R or Julia. | ||
|
|
||
| # Notebook front-end client | ||
|
|
||
| Configuring the notebook frontend | ||
| How front end configuration works | ||
| Example - Changing the notebook’s default indentation | ||
| Example - Restoring the notebook’s default indentation | ||
| Persisting configuration settings | ||
|
|
||
| # Notebook extensions | ||
|
|
||
| Distributing Jupyter Extensions as Python Packages | ||
|
|
||
| Extending the Notebook | ||
|
|
||
| Security in Jupyter notebooks: Since security policies vary from organization to organization, we encourage you to consult with your security team on settings that would be best for your use cases. Our documentation offers some responsible security practices, and we recommend becoming familiar with the practices. |
This file contains bidirectional Unicode text that may be interpreted or compiled differently than what appears below. To review, open the file in an editor that reveals hidden Unicode characters.
Learn more about bidirectional Unicode characters
| Original file line number | Diff line number | Diff line change |
|---|---|---|
| @@ -1,10 +1,155 @@ | ||
| =========== | ||
| Contributor | ||
| =========== | ||
| .. _contributing: | ||
|
|
||
| .. toctree:: | ||
| :maxdepth: 1 | ||
| :caption: Contributor Documentation | ||
| Contributing to Jupyter Notebook | ||
| ====================== | ||
|
|
||
| contributing | ||
| development_faq | ||
| Thanks for contributing to Jupyter Notebook! | ||
|
|
||
| Make sure to follow [Project Jupyter's Code of Conduct](https://github.com/jupyter/governance/blob/master/conduct/code_of_conduct.md) | ||
| for a friendly and welcoming collaborative environment. | ||
|
|
||
| Setting up a development environment | ||
| ------------------------------------- | ||
|
|
||
| Note: You will need NodeJS to build the extension package. | ||
|
|
||
| The `jlpm` command is JupyterLab's pinned version of [yarn](https://yarnpkg.com/) that is installed with JupyterLab. You may use | ||
| `yarn` or `npm` in lieu of `jlpm` below. | ||
|
|
||
| **Note**: we recomment using `mamba` to speed the creating of the environment. | ||
|
|
||
| ```bash | ||
| # create a new environment | ||
| mamba create -n notebook -c conda-forge python nodejs -y | ||
|
|
||
| Activate the environment | ||
| ------------------------------------- | ||
|
|
||
| mamba activate notebook | ||
|
|
||
| Install package in development mode | ||
| ------------------------------------- | ||
|
|
||
| pip install -e ".[dev,test]" | ||
|
|
||
| Link the notebook extension and @jupyter-notebook schemas | ||
| ------------------------------------- | ||
|
|
||
| jlpm develop | ||
|
|
||
| Enable the server extension | ||
| ------------------------------------- | ||
|
|
||
| jupyter server extension enable notebook | ||
| ``` | ||
|
|
||
| `notebook` follows a monorepo structure. To build all the packages at once: | ||
|
|
||
| ```bash | ||
| jlpm build | ||
| ``` | ||
|
|
||
| There is also a `watch` script to watch for changes and rebuild the app automatically: | ||
|
|
||
| ```bash | ||
| jlpm watch | ||
| ``` | ||
|
|
||
| To make sure the `notebook` server extension is installed: | ||
|
|
||
| ```bash | ||
| $ jupyter server extension list | ||
| Config dir: /home/username/.jupyter | ||
|
|
||
| Config dir: /home/username/miniforge3/envs/notebook/etc/jupyter | ||
| jupyterlab enabled | ||
| - Validating jupyterlab... | ||
| jupyterlab 3.0.0 OK | ||
| notebook enabled | ||
| - Validating notebook... | ||
| notebook 7.0.0a0 OK | ||
|
|
||
| Config dir: /usr/local/etc/jupyter | ||
| ``` | ||
|
|
||
| Then start Jupyter Notebook with: | ||
|
|
||
| ```bash | ||
| jupyter notebook | ||
| ``` | ||
|
|
||
| ## Running Tests | ||
|
|
||
| To run the tests: | ||
|
|
||
| ```bash | ||
| jlpm run build:test | ||
| jlpm run test | ||
| ``` | ||
|
|
||
| There are also end to end tests to cover higher level user interactions, located in the `ui-tests` folder. To run these tests: | ||
|
|
||
| ```bash | ||
| cd ui-tests | ||
| # start a new Jupyter server in a terminal | ||
| jlpm start | ||
|
|
||
| # in a new terminal, run the tests | ||
| jlpm test | ||
| ``` | ||
|
|
||
| The `test` script calls the Playwright test runner. You can pass additional arguments to `playwright` by appending parameters to the command. For example to run the test in headed mode, `jlpm test --headed`. | ||
|
|
||
| Checkout the [Playwright Command Line Reference](https://playwright.dev/docs/test-cli/) for more information about the available command line options. | ||
|
|
||
| Running the end to end tests in headful mode will trigger something like the following: | ||
|
|
||
| 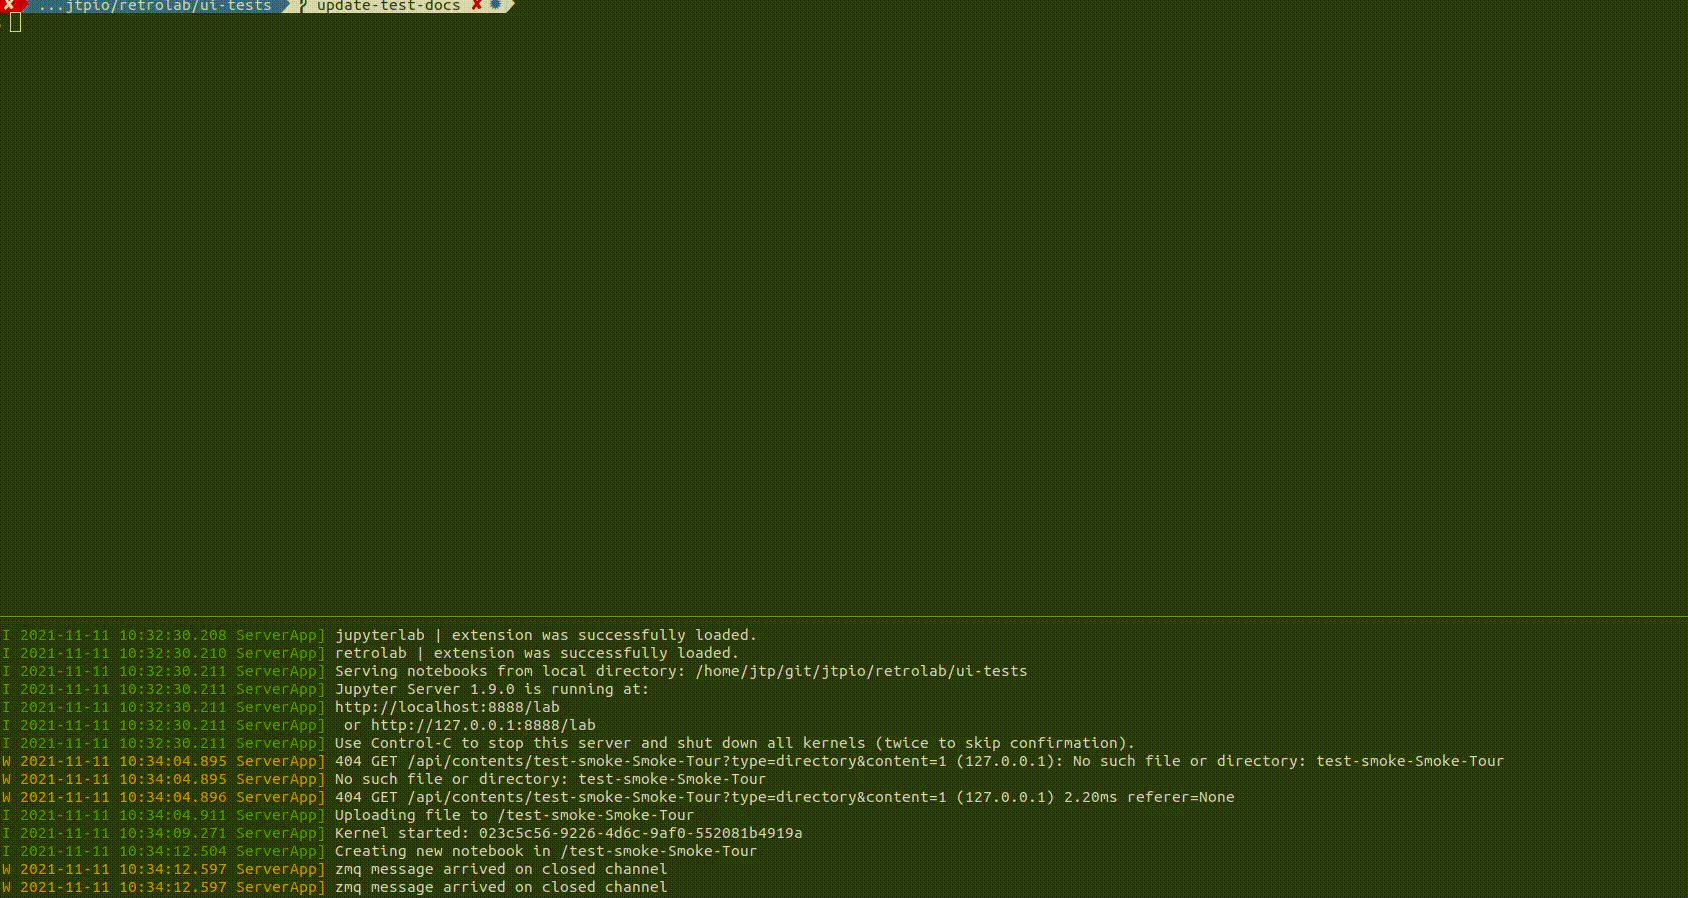 | ||
|
|
||
| Code Styling | ||
| ------------------------------------- | ||
|
|
||
| All non-python source code is formatted using [prettier](https://prettier.io) and python source code is formatted using [black](https://github.com/psf/black)s | ||
| When code is modified and committed, all staged files will be | ||
| automatically formatted using pre-commit git hooks (with help from | ||
| [pre-commit](https://github.com/pre-commit/pre-commit). The benefit of | ||
| using a code formatters like `prettier` and `black` is that it removes the topic of | ||
| code style from the conversation when reviewing pull requests, thereby | ||
| speeding up the review process. | ||
|
|
||
| As long as your code is valid, | ||
| the pre-commit hook should take care of how it should look. | ||
| `pre-commit` and its associated hooks will automatically be installed when | ||
| you run `pip install -e ".[dev,test]"` | ||
|
|
||
| To install `pre-commit` manually, run the following: | ||
|
|
||
| ```shell | ||
| pip install pre-commit | ||
| pre-commit install | ||
| ``` | ||
|
|
||
| You can invoke the pre-commit hook by hand at any time with: | ||
|
|
||
| ```shell | ||
| pre-commit run | ||
| ``` | ||
|
|
||
| which should run any autoformatting on your code | ||
| and tell you about any errors it couldn't fix automatically. | ||
| You may also install [black integration](https://github.com/psf/black#editor-integration) | ||
| into your text editor to format code automatically. | ||
|
|
||
| If you have already committed files before setting up the pre-commit | ||
| hook with `pre-commit install`, you can fix everything up using | ||
| `pre-commit run --all-files`. You need to make the fixing commit | ||
| yourself after that. | ||
|
|
||
| You may also use the prettier npm script (e.g. `npm run prettier` or | ||
| `yarn prettier` or `jlpm prettier`) to format the entire code base. | ||
| We recommend installing a prettier extension for your code editor and | ||
| configuring it to format your code with a keyboard shortcut or | ||
| automatically on save. | ||
|
|
||
| Some of the hooks only run on CI by default, but you can invoke them by | ||
| running with the `--hook-stage manual` argument. | ||
Add this suggestion to a batch that can be applied as a single commit.
This suggestion is invalid because no changes were made to the code.
Suggestions cannot be applied while the pull request is closed.
Suggestions cannot be applied while viewing a subset of changes.
Only one suggestion per line can be applied in a batch.
Add this suggestion to a batch that can be applied as a single commit.
Applying suggestions on deleted lines is not supported.
You must change the existing code in this line in order to create a valid suggestion.
Outdated suggestions cannot be applied.
This suggestion has been applied or marked resolved.
Suggestions cannot be applied from pending reviews.
Suggestions cannot be applied on multi-line comments.
Suggestions cannot be applied while the pull request is queued to merge.
Suggestion cannot be applied right now. Please check back later.
There was a problem hiding this comment.
Choose a reason for hiding this comment
The reason will be displayed to describe this comment to others. Learn more.
How about modifying
CONTRIBUTING.mddirectly? It is included in the docs automatically.https://github.com/jupyter/notebook/blob/main/CONTRIBUTING.md