Setup
The FMTM web app is an app that serves as a frontend for the ODK Central server, using the ODK Central API to allocate specific areas/features to individual mappers, and receive their data submissions.

The FMTM codebase consists of:
- An API backend in FastAPI (code in:
src/backend) - A frontend website in React (code in:
src/frontend)
A computer-screen-optimized web app that allows Campaign Managers to:
- Select AOIs
- Choose task-splitting schemes
- Provide instructions and guidance specific to the project
- View areas that are at various stages of completion
- Provide a project-specific URL that field mappers can access from their mobile phones to select and map tasks.
A mobile data collection tool that functions on almost all Android phones. Field mappers use the ODK mobile app to select features such as buildings or amenities, and fill out forms with survey questions to collect attributes or data about those features (normally at least some of these attributes are intended to become OSM tags associated with those features).
The ODK Collect app connects to a back-end server (in this case ODK Central), which provides the features to be mapped and the survey form definitions.
An ODK Central server that functions as the back end for the field data collectors' ODK Collect apps on their Android phones. Devs must have access to an ODK Central server with a username and password granting admin credentials.
Here are the instructions for setting up an ODK Central server on Digital Ocean (it's very similar on AWS etc)
- Stable internet connection.
- Mapping Knowledge (Optional): While not mandatory, having some mapping knowledge can enhance your experience with FMTM. If you are new to mapping we suggest you to read this
- Go to fmtm .
- If you are new then on the top right cornor click on Sign up and create an account. Else, sign in to your existing account.
- Click the '+ CREATE NEW PROJECT' button.
- Enter the project details.

- Upload Area in the GEOJSON file format.

- Define the tasks of the project.

- Select Form.

-
Click on Submit button.
-
Please watch the video below for more details 👇
fmtm.video.mp4
If you do not want to create a new project and wish to work on an existing project then follow the steps below:
- Go to fmtm .
- If you are new then on the top right cornor click on Sign up and create an account. Else, sign in to your existing account.
- Click the button Explore Projects.
- Select the project you can work on.
- Click on the marked area.
- Click on start mapping.

If you encounter any issues or need assistance while using FMTM, you can access the following resources:
- Check the FAQs .
- Ask your doubts in the Slack channel: #fmtm-field-pilots
We are excited to have you join our community of passionate mappers and volunteers. FMTM is a powerful platform developed by the Humanitarian OpenStreetMap Team (HOT) to facilitate mapping projects for disaster response, humanitarian efforts, and community development.
With FMTM, you have the opportunity to make a real impact by mapping areas that are in need of support. Your contributions help create detailed and up-to-date maps that aid organizations and communities in their efforts to respond to crises, plan infrastructure, and improve the lives of people around the world.
Whether you are a seasoned mapper or new to the world of mapping, FMTM provides a user-friendly interface and a range of tools to make your mapping experience smooth and rewarding. You can create tasks, collaborate with other volunteers, and contribute to ongoing projects that align with your interests and expertise.
By mapping with FMTM, you are joining a global community of dedicated individuals who share a common goal of using open data to make a positive difference. Together, we can create a more resilient and inclusive world.
Explore the projects, join tasks, and contribute your skills to help us build accurate and comprehensive maps. Don't hesitate to ask questions, seek guidance, and engage with fellow mappers through our forums and communication channels.
Thank you for being part of FMTM. Your mapping efforts are invaluable, and we appreciate your commitment to making a difference.
Happy mapping!
The FMTM Team
To view details about the frontend click here
Ideally with a link that opens ODK Collect directly from the browser, but if that's hard, the fallback is downloading a QR code and importing it into ODK Collect.
To in details about the backend click here
A backend that converts the project parameters entered by the Campaign Manager in the Manager Web Interface into a corresponding ODK Central project. It's functions include:
- Convert the AOI into a bounding box and corresponding Overpass API query
- Download (using the Overpass API) the OSM features that will be mapped in that bounding box (buildings and/or amenities) as well as the OSM line features that will be used as cutlines to subdivide the area
- Trim the features within the bounding box but outside the AOI polygon
- Convert the polygon features into centroid points (needed because ODK select from map doesn't yet deal with polygons; this is likely to change in the future but for now we'll work with points only)
- Use line features as cutlines to create individual tasks (squares don't make sense for field mapping, neighborhoods delineated by large roads, watercourses, and railways do)
- Split the AOI into those tasks based on parameters set in the Manager Web Interface (number of features or area per task, splitting strategy, etc).
- Use the ODK Central API to create, on the associated ODK Central server:
- A project for the whole AOI
- One survey form for each split task (neighborhood)
- This might require modifying the xlsforms (to update the version ID of the forms and change the name of the geography file being referred to). This is pretty straightforward using OpenPyXL, though we have to be careful to keep the location within the spreadsheet of these two items consistent.
- GeoJSON feature collections for each form (the buildings/amenities etc)
- An App User for each form, which in turn corresponds to a single task. When the ODK Collect app on a user's phone is configured to function as that App User, they have access to only the form and features/area of that task.
- A set of QR Codes and/or configuration files/strings for ODK Collect, one for each App User
Don't forget to review the Contribution guidelines and our Code of Conduct before contributing!
Here are the steps to contribute to the frontend of Field Mapping Tasking Manager:
Forking creates a copy of the repository in your own GitHub account. Go to the Field Mapping Tasking Manager repository and click the "Fork" button in the top right corner of the page.
Open a terminal and navigate to the directory you want to work in using the following command:
cd <work-dir>
Make sure to replace <work-dir> with the name of your directory.
Clone the forked repository to your local machine using the following command:
git clone https://github.com/<your-username>/fmtm.git
Make sure to replace <your-username> with your GitHub username.
Create a new branch for your changes using the following command:
git checkout -b branch-name
Make sure to give your branch a descriptive name that reflects the changes you'll be making.
Make your contribution, run tests where needed and save.
Add the changes you've made using the following command:
git add <file-name>
Make sure you replace <file-name> with the name of the file you made changes
to.
Once you've added changes, commit them to your local branch using the following command:
git commit -m "Add feature"
Make sure to write a descriptive commit message that explains the changes you've made. Then, push your changes to your forked repository using the following command:
git push origin branch-name
Go to your forked repository on GitHub and click the "Pull requests" tab.
Change the base branch from main to development, select the branch that
contains your changes from the compare branch, then click "Create pull
request".
This will open a new pull request in the fmtm repository, where you can describe
your changes and request that they be merged into the main codebase.
Note: After a PR has been approved and merged, if the branch is no longer in use, delete it both locally and remotely. Otherwise we get buried in dead branches we don't need.
Use the following commands:
Switch out of the branch you want to delete:
git checkout <some-other-branch>Replace
<some-other-branch>with any other existing branch nameDelete the branch locally:
git branch -d <branch-name>and then delete the branch remotely:git push origin --delete <branch-name>Replace
<branch-name>with the name of the branch you want to delete
That's it! You've now contributed to the Field Mapping Tasking Manager.
These steps are essential to run and test your code!
The FMTM uses OAUTH2 with OSM to authenticate users. To properly configure your FMTM project, you will need to create keys for OSM.
-
Login to OSM (If you do not have an account yet, click the signup button at the top navigation bar to create one). Click the drop down arrow on the extreme right of the navigation bar and select My Settings.
-
Register your FMTM instance to OAuth 2 applications. Put your login redirect url as
http://127.0.0.1:7051/osmauth/, For Production replace the URL as production API UrlNote:
127.0.0.1is required instead oflocalhostdue to OSM restrictions.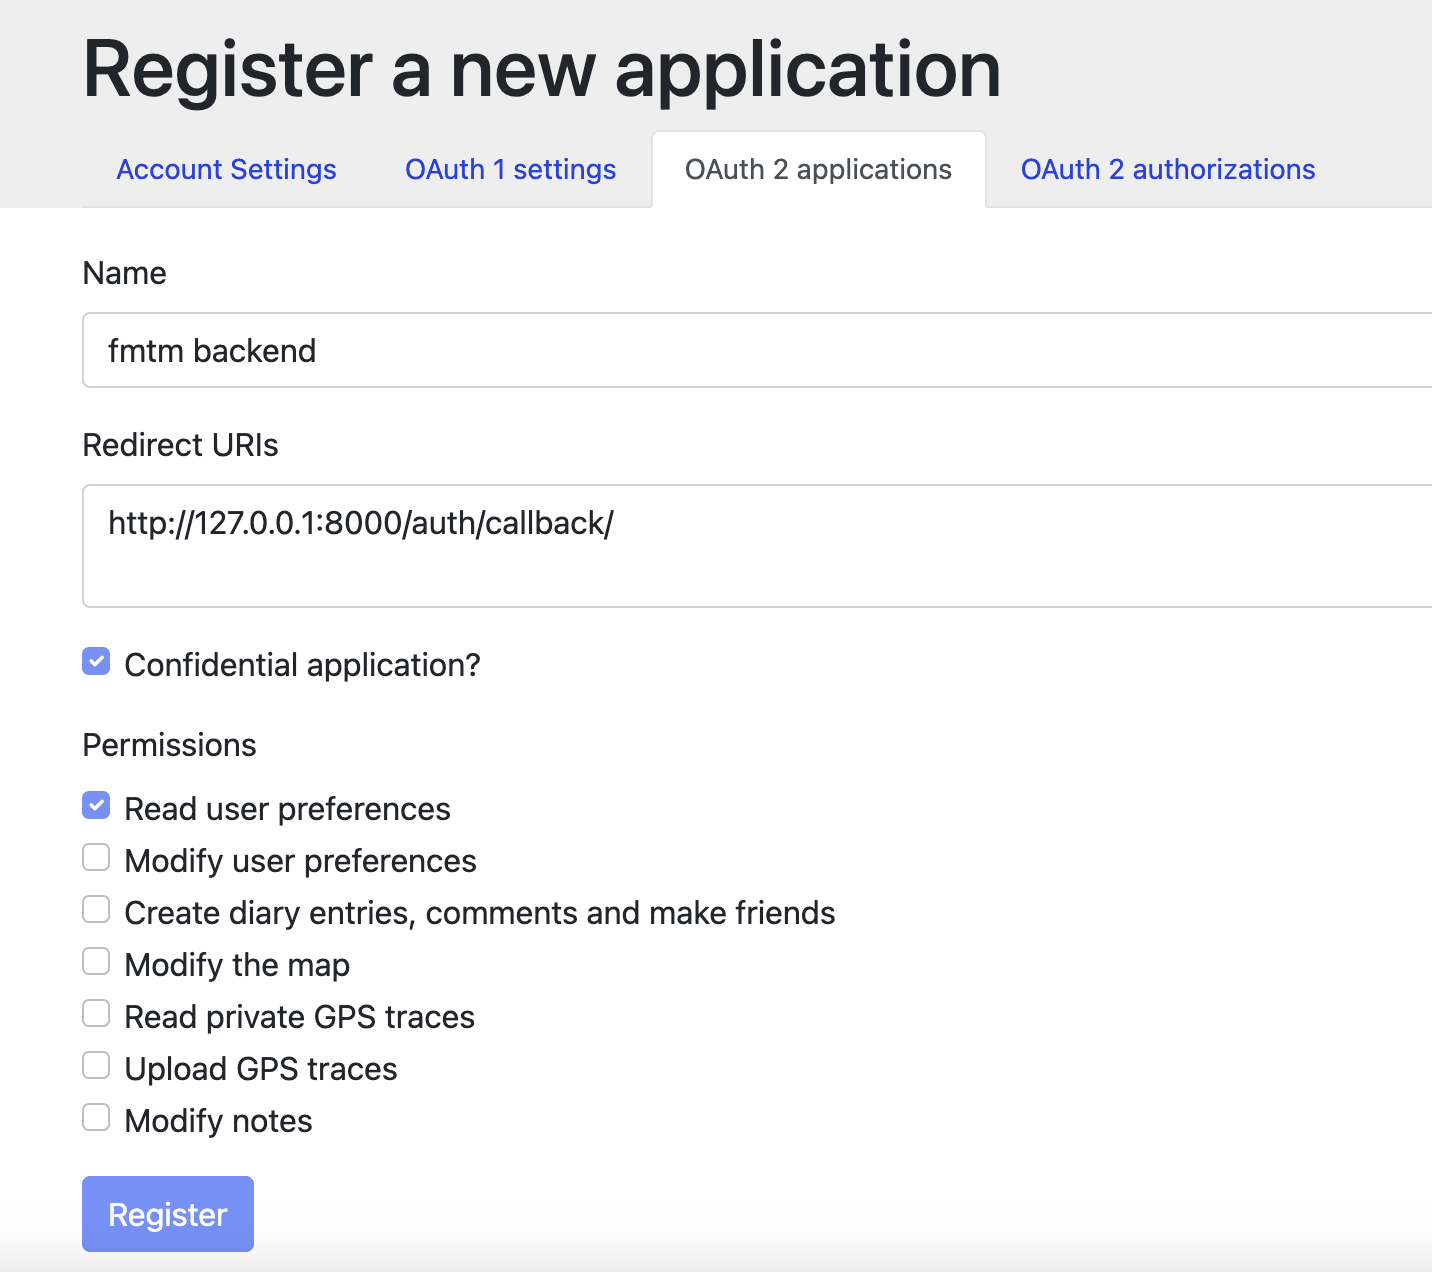
-
Right now read user preferences permission is enough later on fmtm may need permission to modify the map option which should be updated on OSM_SCOPE variable on .env , Keep read_prefs for now.
-
Now Copy your Client ID and Client Secret. Put them in the
OSM_CLIENT_IDandOSM_CLIENT_SECRETfield of your.envfile
Environmental variables are used throughout this project.
To get started, create .env file in the top level dir,
a sample is located at .env.example.
This can be created interactively by running:
bash scripts/gen-env.shNote: If extra cors origins are required for testing, the variable
EXTRA_CORS_ORIGINSis a set of comma separated strings, e.g.: http://fmtm.localhost:7050,http://some.other.domain
For details on how to run this project locally for development, please look at: Backend Docs
Once you have deployed, you will need to check that you can properly authenticate.
-
Navigate to
http://api.fmtm.localhost:7050/docsThree endpoints are responsible for oauth

-
Select the
/auth/osm-login/endpoint, clickTry it outand thenExecute.
This would give you the Login URL where you can supply your osm username and password.Your response should look like this:
{
  "login_url": "https://www.openstreetmap.org/oauth2/authorize/?response_type=code&client_id=xxxx"
}
Now copy and paste your login_url in a new tab. You would be redirected to OSM for your LOGIN. Give FMTM the necessary permission.
After a successful login, you will get your
access_tokenfor FMTM, Copy it. Now, you can use it for rest of the endpoints that needs authorization. -
Check your access token: Select the
/auth/me/endpoint and clickTry it out.
Pass in theaccess_tokenyou copied in the previous step into theaccess-tokenfield and clickExecute. You should get your osm id, username and profile picture id.
Don't forget to review the Contribution guidelines and our Code of Conduct before contributing!
Happy coding!
The FMTM Developer Team