WebViewDesk converts your website to a native desktop application based on the Electron framework. Without learning any programming language, you can build your macOS, Windows and Linux application within a few minutes by following this documentation.
With this, you can easily configure website URLs, Menus, Icons, Hidden Elements, Pop-Ups, Shortcuts, Loading pages, Error handling and many more things as you want. Therefore every website which you used with this will definitely look like a native desktop application.
//Main Application URL
'websiteUrl' : 'http://example.com',
"name": "New_App_Name",
'appName' : 'Name',
"description": "Convert Website to a Desktop application",
//Application window width and height
'width' : Replace_Value,
'height' : Replace_Value,
'minWidth' : Replace_Value,
'minHeight' : Replace_Value,
Important: Default Values
Height : 800px
Width : 600px
minHeight : 0
minWidth : 0
Important
macOS
Optional icon.icns (macOS app icon) or icon.png. Icon size should be at least 512x512.
Windows
Optional icon.ico (Windows app icon) or icon.png. Icon size should be at least 256x256.
Linux
Linux icon sets will be generated automatically based on the macOS icons file or common icon.png.
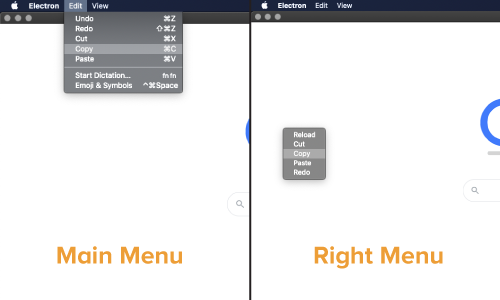
- Main application menu – menu-config.js
 First, create a .html page in your app's public folder. By using the following format, replace the values of your newly created HTML page file name value.
{label : 'Home', click : () => { require('./main')("home") }},
{label : 'About', click : () => { require('./main')("about") }},
{
label: 'New_Menu_Name',
submenu: [
{role : 'reload'},
{role : 'zoomIn'},
{role : 'zoomOut'},
]
},
Undo, redo, cut, copy, paste, pasteAndMatchStyle, delete, selectAll, reload, forceReload, toggleDevTools, resetZoom, zoomIn, zoomOut, togglefullscreen, window, minimize, close, help, about, services, hide, hideOthers, unhide, quit, startSpeaking, stopSpeaking, close, minimize, zoom, front, appMenu, fileMenu, editMenu, viewMenu, recentDocuments, toggleTabBar, selectNextTabNext, you can add your class or id value separated by a comma.
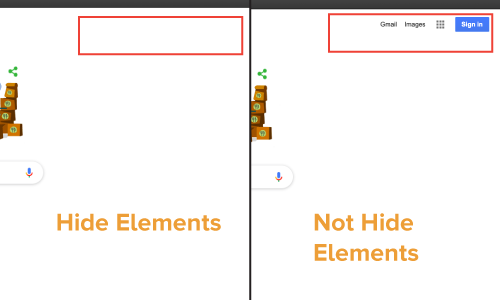
//Hide elements by ID
'hideElementsId' : ['id_1', 'id_2', 'id_3'],
//Hide elements by Class
'hideElementsClass' : ['class_1', 'class_2', 'class_3'],
First, you need to install your computer Node.js latest version
Run the following command.
$ npm install
$ npm start
Important
macOS User – Can build macOS, Windows and Linux version of your application
Windows User – Can only build Windows and Linux versions only
Supported Platforms
macOS
Only 64bit binaries are provided for macOS. The minimum macOS version supported is macOS 10.10 (Yosemite).
Windows
Windows 7 and later are supported. Older operating systems are not supported (and do not work).
Linux
The prebuilt ia32 (i686) and x64 (amd64) binaries of Electron are built on Ubuntu 12.04, the armv7l binary is built against ARM v7 with hard-float ABI and NEON for Debian Wheezy.
$ npm i electron-builder -g
$ electron-builder -mwl
$ electron-builder --mac
$ electron-builder --win
$ electron-builder --linux