As part of your application to be a teaching assistant, we would like you to make a 4-5 minutes video that showcases your teaching. We don’t want you to spend too long making this video, certainly no longer than 1 hour. For a fair assessment, longer videos will be penalized. You can download a sample teaching demo for this tutorial in this repo, or see it on YouTube here.
During the our courses, you will be leading hands-on tutorials live with a small group of students. At the end of each tutorial period you'll bring your whole group of students back for a short discussion, to review the answers to the tutorial and discuss further. Of course, in this teaching demo you're making for us there will be no live students. But we’d like you to review a few exercises as if there were a live audience (though you do not need to interact with this fake audience).
We essentially want you to: 1) get to know the course-specific tutorial, 2) open zoom and hit record and 3) explain one of the exercises as if you were with students who had just finished working that exercise.
Below, we provide course-specific instructions on what to cover in your video, as well as detailed recording instructions.
Course-specific instructions for teaching assistant applications:
- Computational Neuroscience TA application video instructions
- Deep Learning TA application video instructions
- Computational Tools for Climate Science TA Application video instructions
- NeuroAI TA application video instructions
- Evaluation and recording instructions
Lesson Plan Background
For this tutorial you can assume that your students have learnt about:
- The mean-squared error (MSE) and how model parameters (slope) influence the MSE
- Least-squares optimization and Maximum Likelihood Estimation
- Implementing bootstrapping approach to build confidence intervals around the inferred linear model parameters
Tutorial Description
In this set of exercises we will:
- Understand multidimensional linear regression;
- Structure Design Matrix to fit a polynomial regression;
- Visualize the different polynomial regression models;
- Evaluate the polynomial regression models.
You can access the tutorial here:
https://compneuro.neuromatch.io/tutorials/W1D2_ModelFitting/student/W1D2_Tutorial4.html. You can download as a jupyter notebook, but we recommend using google colab to run the notebook. You can hit this badge to load directly:
For computational neuroscience and Neuro AI TA applicants we would like you to structure your five minute video with an emphasis on both theoretical and coding aspect of the models. We will appreciate if your video follows the breakdown given below:
- < 1 min: Introduce yourself. Give a few sentences about who you are!
- < 2 mins: Give a very brief recap of polynomial regression method and explain why you might use it. While you should imagine that you are teaching a class of students, don’t feel the need to address them or ask them questions.
- ~ 2 mins: Work through Coding Exercise 2.1: Structure design matrix explaining the solution code as you go.
Recording & Evaluation Instructions Please follow the instructions given in the Evaluation and recording instructions.
Lesson Plan Background
For this tutorial you can assume that your students have learnt about:
- The differential calculus
- The concept of mean-squared error (MSE) and how model parameters (slope) influence the MSE
- Least-squares optimization and Maximum Likelihood Estimation
Tutorial Description
In this set of exercises we will cover the key concepts behind:
- Gradient descent
- PyTorch Autograd
- PyTorch nn module
You can access the tutorial here:
https://deeplearning.neuromatch.io/tutorials/W1D2_LinearDeepLearning/student/W1D2_Tutorial1.html. You can download as a jupyter notebook, but we recommend using google colab to run the notebook. You can hit this badge to load directly:
For Deep Learning teaching assistant applicants we would like you to structure your five minute video with a slight more emphasis on the coding aspect. We will appreciate if your video follows the breakdown given below:
- < 1 min: Introduce yourself. Give a few sentences about who you are!
- ~ 2 mins: Give a very brief recap of the concept of AutoGrad and explain why it is useful. While you should imagine that you are teaching a class of students, don’t feel the need to address them or ask them questions.
- < 2 mins: Work through the Coding Exercise 2.1: Buiding a Computational Graph explaining the solution code as you go.
Recording & Evaluation Instructions Please follow the instructions given in the Evaluation and recording instructions.
Lesson Plan & Background
For this tutorial you can assume that your students are knowledgable about:
- Climate science basics
- Numerical programming with NumPy
- Computation and masking with Xarray
Tutorial Description
You must use our pre-made notebook for this teaching demo, found here: https://foundations.projectpythia.org/core/xarray/enso-xarray.html. In the provided tutorial you will:
- Load SST data from the CESM2 model
- Mask data using .where()
- Compute climatologies and anomalies using .groupby()
- Use .rolling() to compute a moving average
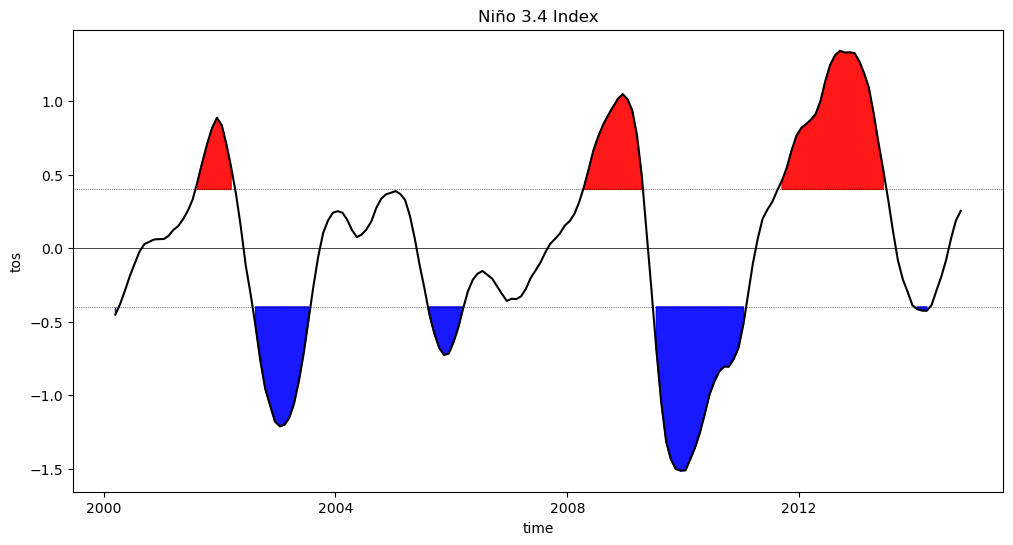
- Compute, normalize, and plot the Niño 3.4 Index
You can download this tutorial and run it using Google Colab, using Binder, or downloading it and running it locally. Below are instructions for each.
Running Jupyter Notebook Locally
-
Click on the download icon, also located in the top right corner of the page, and select “.ipynb”.
-
Follow Project Pythia's specific instructions for using on your own machine..
Running Jupyter Notebook on Binder
Hover over the rocket icon in the top right corner of this page and click “Binder” . Binder is a service that allows you to run Jupyter notebooks without any prior configuration or installation. It may take a few minutes for the Jupyter notebook to load.
Running Jupyter Notebook in Google Colab
-
You can hit this badge(ctrl + click) to load directly in Colab:
.
-
Run the following cell before importing the libraries in the notebook. This will install Anaconda in the Colab environment.
!pip install -q condacolab
import condacolab
condacolab.install()
-
The runtime will automatically restart and you can run the following cell to install the required libraries.
!conda install -c conda-forge cartopy
!pip install xarray[complete] pythia-datasets cftime
Structure for your 5-min video
For Climatematch TA applicants you are required to structure your five minute as follows:
- (< 1min) : Begin with a short introduction (who you are, your interests, etc.)
- (~2 min) : Give a very brief recap of the concept of the El Nino Southern Oscillation (ENSO) and why this phenomenon is important for climate scientists to study. While you should imagine that you are teaching a class of students, don’t feel the need to address them or ask them questions.
- (~2 min) : Walk through the process of calculating the Niño 3.4 Index using Xarray. You can start from the section “Compute the anomalies” to make a more efficient use of the time. Explain the solution code as you go. The final plot should be generated during the video.
Recording & Evaluation Instructions Please follow the instructions given in the Evaluation and recording instructions.
How we will evaluate your video
We are looking for people who are able to communicate well and who show their knowledge of Python including live coding during. We’re looking for quality over quantity, so don’t feel pressured to rush through everything. Instead, make sure the content you do get to is clear and easy to follow.
Recording the video
Because we will be using Zoom during our courses, you must record your lesson using Zoom (instructions below). We recommend doing a 'test' recording (of just you speaking, scrolling through the tutorial, etc but not the full thing) prior to recording your actual demo to make sure your audio is clear and that everything is working properly. The recording of your actual demo should be a “single take” and you shouldn’t do any post-production work on the video.
Uploading the video to YouTube or Bilibili
In your TA application you will need to provide a link to your sample teaching video. The easiest way to do this is to upload a video to YouTube and set the visibility setting to ‘unlisted’, as we’ve done for the sample. This means only people who have the link can view your video. Anyone can create an account on YouTube and upload videos for free. If you are in a country where YouTube is blocked, please upload your video to Bilibili.
Length of the video
As we mentioned we want the video to be 4-5 minutes long. You don’t have to conclude nicely -- feel free to cut the video at 4 minutes, even if you aren’t quite done. Making mistakes is ok! Point them out and use them as teaching moments. Do not feel the need to overproduce your video! We are trying to scale here, we hope you understand :-)
Zoom Instructions
-
Open Zoom and press “New Meeting” (or “Host a Meeting”).
-
Make sure your microphone is unmuted and your video is on.
-
Zoom has a variety of teaching tools you can take advantage of (though none in particular are required). Press the
-
“Share Screen” button and select one of the following:
-
Choose the window you have previously opened if you want to write code
-
Choose “Whiteboard” if you want to use the built-in whiteboard feature. Feel free to record an actual whiteboard if you have access to that as well, or to not use a whiteboard at all!
-
Choose “iPhone/iPad” if you’d like to share work on an iPad (having an iPad is not required).
-
Some tips for sharing your screen:
- To change what screen you’re sharing, hover over the floating green bar with the meeting ID to bring up the menu and hit “New Share”.
- You can stop sharing your screen/whiteboard with the red “Stop Share” button.
-
When you’re ready to record, bring up the menu and (if you have screen sharing) press “More” then “Record on this computer” (or just “Record” and then “Record on this computer” if you’re starting without screen sharing).
-
Once you’re finished, hit the square Stop symbol to stop the recording, and then “End Meeting.” Once you’ve ended the meeting, Zoom will save the recording and should automatically open up the folder it was saved to (if not, go to “Documents/Zoom/[insert date of recording + name of Zoom meeting room]”).
-
Upload the mp4 file in that folder (which should be called zoom_0.mp4 or something similar).
-
For more details or troubleshooting, see here.