The package depends on moveit and apriltag.
sudo apt install ros-melodic-moveit
Download darknet_ros: darknet_ros
-
mkdir -p terminator_ws/src -
cd terminator_ws/src -
download terminator.rosinstall
-
wstool init -
wstool merge terminator.rosinstall -
wstool update -
~/terminator -
catkin_makefollowed bysource devel/setup.bash -
To connect to robot and enable it
source src/final-project-terminator/config/connect.sh
-
roslaunch terminator image_pipeline.launch -
rosrun terminator safe_arms -
roslaunch terminator move.launch -
roslaunch terminator manipulate.launch -
rosrun terminator commander
The goal of this project was to have Baxter pick up a nerf gun, locate a cup, pull the nerf gun trigger to shoot the cup when given a user input, and move to a final pose.
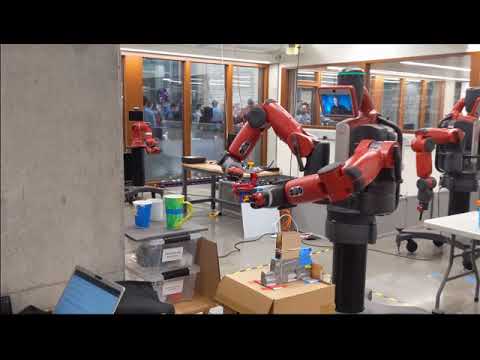
(click image to go to the Youtube video)
- Baxter goes through initial calibration and start up sequence. Arms are moved to an initial pose.
- Baxter finds the nerf gun using an AprilTag and its left arm camera
- Baxter moves its left arm to line up with the nerf gun and closes its gripper to pick up the gun
- Once Baxter has the gun, it uses its left arm camera to find a cup using darknet
- Baxter keeps moving its left arm until the cup is in the center of the image produced by the camera
- Baxter moves its right arm to put its grippers around the nerf gun trigger
- Baxter waits for a user input to confirm the firing of the gun
- Baxter keeps waiting until the user tells it to fire
- Baxter pulls the trigger using its right gripper
- Baxter moves to a final pose right after shooting
The commander node runs an action server to orchestrate the state machine. The commander node is the client and the final_pose, move_left, and move_right nodes are the servers. The action specification included the goal, feedback, and result messages which are defined in Commands.action. The commander node sends a string goal that specifies which part of the action sequence baxter is currently in. The node with the associated goal will then be called to execute the desired action. For example, when the goal is "get_gun", the sequence in move_left that enables baxter to get the gun is called. During the motions, feedback is provided in the form of a string. When the goal is reached (the action finished executing) or the goal was failed to be reached, a boolean will be sent from the server to the client. The commander node only calls the next action sequence step once the current one has given a success defined as True from the resultant boolean. When baxter is in the position to shoot with its right gripper on the trigger, the commander node waits for a user input. The user must type "yes" or "y" (the case of the letters don't matter, they can be uppercase or lowercase). If any other response is typed in by the user, the commander will ask for a different response until "yes" or "y" is inputted which triggers baxter to pull the trigger and shoot.
The commander node also initializes the face of baxter with the time cop picture.
The image pipeline node gets the image from baxter's hand cameras, rectifies it, and sends it to darknet. Darknet then returns a list of objects it has detected in the image. The image_pipeline node then finds the most probable cup in the classified list and publishes this object's (x,y) pair in the image.
This node is responsible for manipulation of the left arm. This node is responsible for picking up the gun and aiming. In order to pick up the gun the node subscribes to /gun_pose which contains the pose of the gun based on the april tag in the camera's frame of reference. The pose of the tag in Baxter's frame is computed using the pose of the gripper. This node subscribes to /targetBox which is a Point type that encodes the center of the bounding box for a cup in pixel coordinates. Aiming is accomplished by moving the gripper in Baxter's YZ plan in 1cm increments until the center of the bounding box for a cup is within a 20 pixel tolerance of the center of the camera's frame. The cameras are located at the writs of each gripper.
This node primarily takes advantage of moveit's path planning function compute_cartesian_path() to develop a plan between two pose goals. In src/terminator/gripper.py the implementation of most of moveit's functionality for manipulation can be found. The function plan_cartesian_path() calls compute_cartesian_path() and linearly interpolates a trajectory consisting of 10 waypoints between start and goal poses for a gripper. The function compute_cartesian_path() returns a fraction describing how much of the desired trajectory can be completed. If the planner can complete less than 80% of the trajectory the moveit planner has 3 more attempts. If the planner can not reach the threshold of 80% the moveit function set_pose_target() is used for manipulation. After a gripper reaches the end of its trajectory the pose is recorded using moveit's function get_current_pose(). If the pose is within the desired tolerances it is considered a successful move and the goal has been reached.
This node is responsible for manipulation of the right arm. This node is responsible for pulling the trigger. The same implementations are used as described in the move_left node description above. In order to pull the trigger the right gripper goes to a standoff position that is perpendicular to the left gripper. From there the right gripper moves in to pull the trigger but first waits for the user to type yes in the terminal.
This node is responsible for manipulation of both the left and right arm. This node is responsible for reaching the final configuration. The same implementations are used as described in the move_left node description above. Two goals for the left arm and one goal for the right arm are pre-coded. After the commander send yes to this node, the right arm would move to the goal, then the left arm would first got to the first goal and then to the second goal.
This node is responsible for moving baxter's left and right arms to a good initial configuration. This node is run first before the rest of the code. This node uses baxter's forward kinematics and joint angles that we manually found by moving baxter's arms and determining which configurations could help us avoid singularities best and motions that caused baxter to rotate and flip his arm is weird ways.
image_pipeline.launch launches darknet_ros, apriltags_ros, imageproc, the image_pipeline node, and an image view node. Darknet runs a neural network to reconize objects in images. apriltag_ros reconizes april tags in images. imageproc rectifies images. The image_pipeline node ties all the other image processing nodes together and orchestrates their interactions. The image view node launches a window to view the image classified by the neural network.
manipulate.launch launches move_left, move_right, and final_pose nodes. The move_left node controls all the motions baxter's left arm does (locating the gun, picking up the gun, finding the cup to shoot). The move_right node controls all the motions baxter's right arm does (moving to and pulling the trigger). The final_pose node controls the motion for both the left and right arm to move to a predefined final pose.
move.launch launches baxter's joint trajectory action server, the joint state publisher, image_pipeline.launch, and manipulate.launch. The joint trajectory action server is used for the arm motion control. The joint state publisher is used to get state feedback for the gripper pose.
Lessons learned: The whole teamed learned a lot about ROS! We also learned how to use MoveIt and its motion planning algorithms. Finally, we all realized that it takes a lot of tuning and effort to make Baxter's performace robust.
Algorithms used: Darknet ros uses a deep neural network to recognize objects.
We used moveIt's computeCartesianWaypoint method to find the path between waypoints.
We used the baxter_interface.Limb method move_to_joint_positions for the forward kinematics of the arms in safe_arms
To aim the gun to hit the target, we simply move the gun so that the object appears in the center of the image.
We forked the library and made a few small configuration changes. The forked repo is included in the terminator.rosinstall file
We forked the apriltags_ros library and included our copy in the terminator.rosinstall file. This library detects april tags in the enviroment. In order to use it, one needs to edit apriltag_ros/apriltag_ros/config/tags.yaml with the family, id and sizes of the tags you want the library to recognize.
It was discovered that Baxter's forward kinematics from its baxter_interface api conflicts with the MoveIt! and was therefore unable to be run at the same time a node was running MoveIt!. The safe_arms node has to be launched first so baxter can move its arms to good initial configurations. For these reason, the safe_arms node isn't included in any launch files and is instead run separately at the very beginning. This node only executes once.
MoveIt! Gave us some very roundabout, unsafe and inefficient paths when simply trying to reach a certain configuration. The controller of moveit can fail easily. Even though it was some in rviz that a path was planned and executable, Baxter wasn't always able to actually execute the trajectory.
The precision of the movements required created very tight tolerances that Baxter had difficulties achieving, either due to the nature of his actuators or the calibration of the arms. Baxter has a safety system in place so that he doesn’t collide with himself. This proved to be a challenge because the gun is small; attempting to pull the trigger with the right arm while the left arm holds the gun instigated the safety system and would move his hands away from each other. The grippers also occluded the cameras used for tracking targets.
Workarounds that we implemented were adding 3D printed gripper extensions on his grippers that raised the point of contact with his grippers, used in tandem with a 3D printed blocked that slid onto the rail of the gun. Each grippers had 10mm disk three magnets on the side that would contact the block. The sides of the block also had 3 corresponding magnets. The magnets allowed the grippers to snap into place with the block once close enough. This helped give us more tolerance in our precision when picking up the gun. The magnets were flush inside the 3D printed parts to give a smooth contact surface. we decided to just tape the magnets on in case we wanted to remove any or change polarity. The combination of the magnets and baxter's gripper holding force allowed the gun to be securely held.
The block served a variety of purposes; first it raised the gun further, keeping the camera vision as clear as possible, but it also moved the gun further from Baxter’s left gripper, increasing the tolerance the right gripper had to pull the trigger. Raising the gun also allowed it to be handled while cocked. While cocked, the gun’s spring loaded piston extends backwards. Raising the gun allowed the piston to freely move above Baxter’s wrist. We also experimented with using longer grippers for the trigger hand, but found that using the stock, wide grippers was sufficient to pull the trigger.
Implementing Darknet proved to be challenging as well. While Darknet objectively does the job of classifying objects in the camera frame, it was often inconsistent, thus the experimental setup had to be robust to provide a consistent environment for Baxter to operate in and perform the routine consistently. Depending on the lighting in the room and how shadows and bright spots were on objects, Darknet had varying levels of difficulty in object recognition. If the environment was too bright or too dark, objects couldn't be detected or accurately classified. A black tarp was taped to the ceiling to cover a light that shown directly on the objects and made object recognition more difficult.
First, a cup was used as a target for the project. The inconsistency of Darknet required using multiple cups in an effort to brute-force Baxter into recognizing at least one. It was discovered that Darknet tends to recognize cups that are not too wide and have handles better. If the top lip of the cup and the very top of the inside of the cup would be seen, the cup was also able to be detected easier. Other objects could be easier. For example, Baxter has no difficulty recognizing people, but that ethically crosses some boundaries. Further addressing the experimental setup, the tables used were marked on the floor with tape so that they were in the same position for each test run, and a crude holster was constructed so that the gun was consistently in the same place. The same initial positions of the arm were also hard coded to improve consistency in path planning.
Sometimes the cameras didn't output videos or had issues when running. To counteract this, we closed all of baxter's cameras (left hand, right hand. and head) and then opened the left hand camera. This process is listed below:
close cameras
rosrun baxter_tools camera_control.py -c left_hand_camerarosrun baxter_tools camera_control.py -c right_hand_camerarosrun baxter_tools camera_control.py -c head_camera
open left hand camera
rosrun baxter_tools camera_control.py -o left_hand_camera
We would like to implement tracking and shooting of objects that move through space. This would require a more robust system than Darknet since the update rate was extremely slow. We could potentially also take out objects we aren't detecting in Darknet. For stationary objects, we could implement a planning algorithm that once the camera detects the desired object, we would no longer have to run Darknet or other object detection algorithms which would speed up the time it takes between first detecting an object and being lined up to shoot it. The planning algorithm could estimate the distance the arm should move in relation to where the object was detected in the image. We would likely need to implement another method of pulling the trigger since it was easy to accidentally miss due to the tight tolerance. It would be hard to move the gun and have both of the robot's hands on the trigger. To pull the trigger, we could use a rasberry pi on a wifi network and send it a signal to shoot. This would require some sort of mechatronic device. Without a mechatronic device, a trigger extension could be designed and 3D printed to allow more surface area on the trigger so it could be pulled.