
Back | Next | Contents
Transfer Learning
Transfer learning is a technique for re-training a DNN model on a new dataset, which takes less time than training a network from scratch. With transfer learning, the weights of a pre-trained model are fine-tuned to classify a customized dataset. In these examples, we'll be using the ResNet-18 and SSD-Mobilenet networks, although you can experiment with other networks too.

Although training is typically performed on a PC, server, or cloud instance with discrete GPU(s) due to the often large datasets used and the associated computational demands, by using transfer learning we're able to re-train various networks onboard Jetson to get started with training and deploying our own DNN models.
PyTorch is the machine learning framework that we'll be using, and example datasets along with training scripts are provided to use below, in addition to a camera-based tool for collecting and labeling your own training datasets.
If you are Running the Docker Container or optionally chose to install PyTorch back when you Built the Project, it should already be installed on your Jetson to use. Otherwise, if you aren't using the container and want to proceed with transfer learning, you can install it now:
$ cd jetson-inference/build
$ ./install-pytorch.sh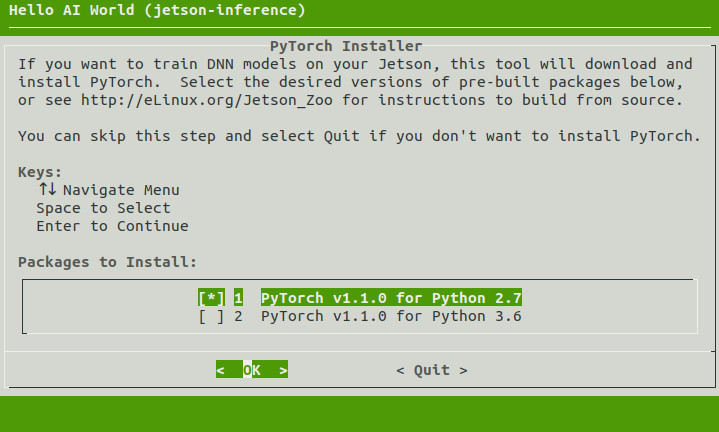
note: the automated PyTorch installation tool requires JetPack 4.2 or newer.
and if you want to do Object Detection Training, you should use JetPack 4.4 or newer and install PyTorch for Python 3.6.
You can test that PyTorch was installed correctly and detects your GPU by executing these commands from an interactive Python shell - run python or python3 from a terminal:
>>> import torch
>>> print(torch.__version__)
>>> print('CUDA available: ' + str(torch.cuda.is_available()))
>>> a = torch.cuda.FloatTensor(2).zero_()
>>> print('Tensor a = ' + str(a))
>>> b = torch.randn(2).cuda()
>>> print('Tensor b = ' + str(b))
>>> c = a + b
>>> print('Tensor c = ' + str(c))
>>> import torchvision
>>> print(torchvision.__version__)Note that the torch version should be reported as 1.6.0 and the torchvision version should be 0.7.0.
Unless you are on Jetson AGX Xavier, you should mount 4GB of swap space, as training uses up a lot of extra memory.
Run these commands on your Jetson (outside of container) to disable ZRAM and create a swap file:
sudo systemctl disable nvzramconfig
sudo fallocate -l 4G /mnt/4GB.swap
sudo mkswap /mnt/4GB.swap
sudo swapon /mnt/4GB.swap
Then add the following line to the end of /etc/fstab to make the change persistent:
/mnt/4GB.swap none swap sw 0 0Now your swap file will automatically be mounted after reboots. To check the usage, run swapon -s or tegrastats. Disabling ZRAM (in-memory compressed swap) also free's up physical memory and requires a reboot to take effect.
If you are running low on memory while training, you may want to try disabling the Ubuntu desktop GUI while you are training. This will free up extra memory that the window manager and desktop uses (around ~800MB for Unity/GNOME or ~250MB for LXDE)
You can disable the desktop temporarily, run commands in the console, and then re-start the desktop when you are done training:
$ sudo init 3     # stop the desktop
# log your user back into the console
# run the PyTorch training scripts
$ sudo init 5     # restart the desktop
If you wish to make this persistent across reboots, you can use the follow commands to change the boot-up behavior:
$ sudo systemctl set-default multi-user.target     # disable desktop on boot
$ sudo systemctl set-default graphical.target      # enable desktop on boot
Then after you reboot, the desktop will remain disabled or enabled (whichever default you set).
Below are step-by-step instructions to re-training models on some example datasets with transfer learning, in addition to collecting your own data to create your own customized models:
- Classification/Recognition (ResNet-18)
- Object Detection (SSD-Mobilenet)
This table contains a summary of the datasets and their associated training times:
| Type | Dataset | Size | Classes | Training Images | Time per Epoch* | Training Time** |
|---|---|---|---|---|---|---|
| Classification | Cat/Dog |
800MB | 2 | 5,000 | ~7-8 minutes | ~4 hours |
| Classification | PlantCLEF |
1.5GB | 20 | 10,475 | ~15 minutes | ~8 hours |
| Detection | Fruit |
2GB | 8 | 6,375 | ~15 minutes | ~8 hours |
* Approximate time for one complete training pass over the dataset with Jetson Nano
** Approximate time for training the model for 35 epochs with Jetson Nano
Next | Re-training on the Cat/Dog Dataset
Back | Monocular Depth with DepthNet
© 2016-2019 NVIDIA | Table of Contents