
Back | Next | Contents
Image Classification
There are multiple types of deep learning networks available, including recognition, detection/localization, and semantic segmentation. The first deep learning capability we're highlighting in this tutorial is image recognition, using classifcation networks that have been trained on large datasets to identify scenes and objects.

The imageNet object accepts an input image and outputs the probability for each class. Having been trained on the ImageNet ILSVRC dataset of 1000 objects, the GoogleNet and ResNet-18 models were automatically downloaded during the build step. See below for other classification models that can be downloaded and used as well.
As an example of using the imageNet class, we provide sample programs for C++ and Python:
imagenet.cpp(C++)imagenet.py(Python)
These samples are able to classify images, videos, and camera feeds. For more info about the various types of input/output streams supported, see the Camera Streaming and Multimedia page.
First, let's try using the imagenet program to test imageNet recognition on some example images. It loads an image (or images), uses TensorRT and the imageNet class to perform the inference, then overlays the classification result and saves the output image. The project comes with sample images for you to use located under the images/ directory.
After building the project, make sure your terminal is located in the aarch64/bin directory:
$ cd jetson-inference/build/aarch64/binNext, let's classify an example image with the imagenet program, using either the C++ or Python variants. If you're using the Docker container, it's recommended to save the classified output image to the images/test mounted directory. These images will then be easily viewable from your host device in the jetson-inference/data/images/test directory (for more info, see Mounted Data Volumes).
# C++
$ ./imagenet images/orange_0.jpg images/test/output_0.jpg     # (default network is googlenet)

# Python
$ ./imagenet.py images/orange_0.jpg images/test/output_0.jpg # (default network is googlenet)note: the first time you run each model, TensorRT will take a few minutes to optimize the network.
this optimized network file is then cached to disk, so future runs using the model will load faster.

# C++
$ ./imagenet images/strawberry_0.jpg images/test/output_1.jpg

# Python
$ ./imagenet.py images/strawberry_0.jpg images/test/output_1.jpg
In addition to loading single images, you can also load a directory or sequence of images, or a video file. For more info, see the Camera Streaming and Multimedia page or launch the application with the --help flag.
The following pre-trained image classification models are available to use and will be automatically downloaded (the default is googlenet):
| Network | CLI argument | NetworkType enum |
|---|---|---|
| AlexNet | alexnet |
ALEXNET |
| GoogleNet | googlenet |
GOOGLENET |
| GoogleNet-12 | googlenet-12 |
GOOGLENET_12 |
| ResNet-18 | resnet-18 |
RESNET_18 |
| ResNet-50 | resnet-50 |
RESNET_50 |
| ResNet-101 | resnet-101 |
RESNET_101 |
| ResNet-152 | resnet-152 |
RESNET_152 |
| VGG-16 | vgg-16 |
VGG-16 |
| VGG-19 | vgg-19 |
VGG-19 |
| Inception-v4 | inception-v4 |
INCEPTION_V4 |
Generally the more complex networks can have greater classification accuracy, with increased runtime.
You can specify which model to load by setting the --network flag on the command line to one of the corresponding CLI arguments from the table above. By default, GoogleNet is loaded if the optional --network flag isn't specified.
Below are some examples of using the ResNet-18 model:
# C++
$ ./imagenet --network=resnet-18 images/jellyfish.jpg images/test/output_jellyfish.jpg

# Python
$ ./imagenet.py --network=resnet-18 images/jellyfish.jpg images/test/output_jellyfish.jpg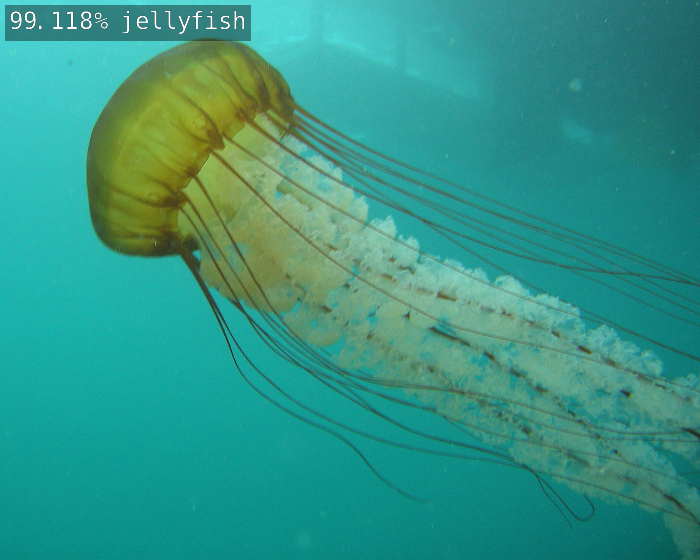
# C++
$ ./imagenet --network=resnet-18 images/stingray.jpg images/test/output_stingray.jpg

# Python
$ ./imagenet.py --network=resnet-18 images/stingray.jpg images/test/output_stingray.jpg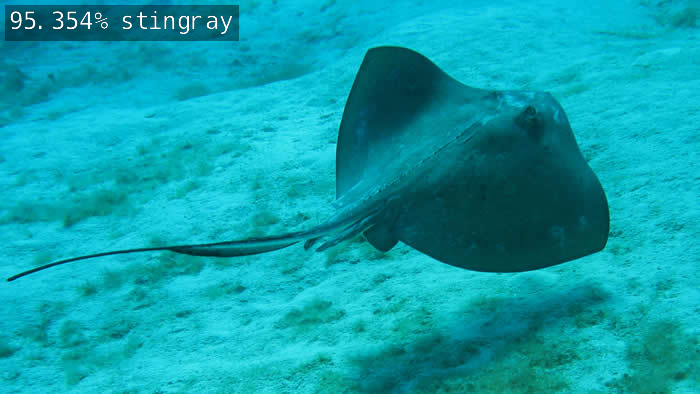
# C++
$ ./imagenet --network=resnet-18 images/coral.jpg images/test/output_coral.jpg

# Python
$ ./imagenet.py --network=resnet-18 images/coral.jpg images/test/output_coral.jpg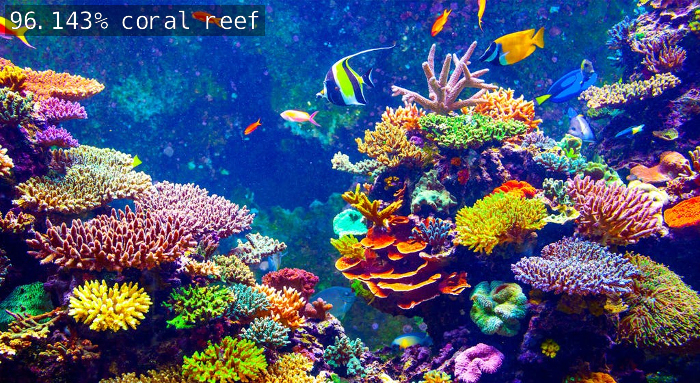
Feel free to experiment with using the different models and see how their accuracies and performance differ - you can download more models with the Model Downloader tool. There are also various test images found under images/
The Camera Streaming and Multimedia page shows the different types of streams that the imagenet program can handle.
Here is an example of running it on a video from disk:
# Download test video (thanks to jell.yfish.us)
$ wget https://nvidia.box.com/shared/static/tlswont1jnyu3ix2tbf7utaekpzcx4rc.mkv -O jellyfish.mkv

# C++
$ ./imagenet --network=resnet-18 jellyfish.mkv images/test/jellyfish_resnet18.mkv

# Python
$ ./imagenet.py --network=resnet-18 jellyfish.mkv images/test/jellyfish_resnet18.mkv
Next we'll go through the steps to code your own image recognition program from scratch, first in Python and then C++.
Next | Coding Your Own Image Recognition Program (Python)
Back | Building the Repo from Source
© 2016-2019 NVIDIA | Table of Contents